")
")
Preparations
First of all, a list of the things that you must first have in order before you can start with the further preparations. Only after all preparations have been made can we start setting up the server laptop.
An “always-on” internet connection.
Of course you need a good connection to the internet that is available 24/7 and has sufficient bandwidth.
The days when we first had to establish a connection with beeping, whistling and rattling modems before we could surf the internet are long gone, and in most homes we have an internet connection that is continuously available. However, not all internet connections are suitable.
In the Netherlands we have known the ADSL connection and the internet connection via the television cable for a long time. Certainly the ADSL connections, but also the somewhat older cable internet connections are “asynchronous”. This means that the upload speed and the download speed are not the same. The upload speed (the speed of the data traffic from your home to the internet) is often many times slower than the download speed (the speed of the internet to your home). This is not a problem for normal internet use, but if you want to run a server at home, the upload speed from your home to the internet is the most important.
Fortunately, technology has not stood still. The latest cable internet connections nowadays have an upload speed that is (almost) equal to the download speed, and with the rise of fiber optic internet connections for home use, we have really good connections. Unfortunately, in many cases the “old” providers still offer asynchronous connections even over fiber optics. KPN offers e.g. over fiber optic connections with download/upload speeds of 50Mb/5Mb, 100Mb/10Mb and 200Mb/20Mb. These types of connections are not suitable for running a web server at home because the upload speed is too slow. Fortunately, you can get fiber optic internet connections from the vast majority of providers that have an equally fast upload and download speed. The cheapest subscriptions already have speeds of around 100Mbit/sec, most providers also offer speeds of 250 up to even 1000Mbit/sec. In principle, everything with an upload speed of 100Mbit/sec or more is suitable for running your web server at home. I myself have a connection with a speed of 400Mbit/sec.
An old properly-functioning laptop.
If you still have a somewhat older laptop lying around, you can in most cases still use it as a web server. Otherwise, a suitable device can often be found on the second-hand market without it having to cost a lot.
Pay attention to the hardware. Think for the processor at least of an Intel Celeron, a Core i3, or a comparable AMD processor.
As far as memory is concerned, 2Gb is theoretically the absolute minimum, but then you have to be very careful about what you load in memory of the server. Practically speaking, you want 4Gb or more.
The required disk space depends of course on what you want to make available on your server, but most laptops will have a disk of 250GB or more, and that is certainly enough to get started. It is even better if it contains an SSD instead of a rotating mechanical hard disk. They are faster, use less power and are silent.
And of course a wired network connection so that you can connect the laptop to your home network with a wired connection. Believe it or not, there are nowadays laptops that do not have a wired network connection at all so that they are, even for use as an ordinairy laptop, completely useless in places where you do not have WiFi available.
It is also a good idea to take a look at the power consumption. Some laptops simply use more energy than others, and we ultimately want to leave it on 24/7. Keep in mind that there are also a few things you can do to ensure that the laptop uses less power. If e.g. when the lid of the laptop is closed, the display switches off, which already saves quite a bit of energy. If you are technically inclined, you can possibly remove some hardware from the laptop that you do not need anyway so that it no longer uses any energy. Think e.g. switching off or possibly removing the WiFi adapter and removing the CD-ROM drive. Replacing a mechanical hard disk with an SSD disk is also useful because an SSD uses less energy and is also faster and completely silent.
I myself use an old HP Probook 4320s from March 2011. It has an Intel Core i3-370M processor running at 2.26GHz, and 4GB DDR3 memory. I replaced the original 320GB hard disk with a 256GB SSD. I also removed the DVD drive. We won't use it anyway, and when it's out, it won't use any electricity. In addition, the opening provides some extra ventilation. The wired network connection of this laptop is 1Gb/s.
A USB stick.
Also make sure you have a USB stick of at least 2GB at hand. We will use it as a boot medium to start the laptop when we install the Linux Operating System.
A place to put your server laptop.
That seems obvious, but first consider where you want to place the server laptop, and make sure that you have power and a network connection there. You would not be the first to have the server laptop in the way on the desk for months before a good place is finally found.
A few useful utilities on your Windows computer.
It is useful to install some tools on your own computer for managing Linux machines. All these programs are free Open-Source software, so they don't cost you anything.
PuTTY.
PuTTY is a free and open-source terminal emulator for Windows, which supports various network protocols, such as Telnet, SSH, SCP, rlogin, a raw socket connection or even an old-fashioned serial cable connection (if your computer still has such an old-fashioned connection). If you have installed PuTTY on your computer, you no longer need to touch the keyboard of the server laptop for most things, but you can do that remotely using PuTTY. This allows you to place the server laptop somewhere “in a dark corner” with the lid closed. This terminal is, as mentioned, open-source software and can be downloaded from https://www.putty.org.
WinSCP.
WinSCP is a free and open-source client application for SCP, SFTP, FTP, WebDAV and Amazon S3. With this program you can easily exchange files with a server in a safe way. It has a file manager-like graphical interface. We use the Secure Copy Protocol (SCP) to exchange files with the server. It is also possible to edit text files on the server directly in WinSCP or to call an external program, such as Notepad ++, from WinSCP. WinSCP is also open Source software. You can download it from https://winscp.net/eng/download.php.
Notepad++.
Notepad ++ is a very handy notepad replacement in Windows. Not only can you edit multiple files at the same time, but it can also edit files with the correct line breaks, e.g. CR + LF for Windows files, LF for Unix/Linux files and CR for MacOS files. In addition, Notepad ++ has syntax highlighting for over 80 programming and scripting languages, such as HTML, CSS, JavaScript, PHP, Perl, XML YAML, and many more.
You can download Notepad++ from https://notepad-plus-plus.org/downloads.
7-zip.
7-zip is a very handy open source archiver tool that can be used not only with a Graphical User Interface, but also via the command line with the command p7zip. In addition, it has “shell integration”. That means that you can also call it directly from windows explorer.
For packing and unpacking files, it supports not only its own 7z format, but also ZIP, gzip, bzip2, xz, tar, and WIM.
There are also tons of formats that he can unpack on his own, such as APM, ar, ARJ, chm, cpio, deb, FLV, JAR, LHA / LZH, LZMA, MSLZ, Office Open XML, onepkg, RAR, RPM, smzip, SWF , XAR, Z archives and cramfs, DMG, FAT, HFS, ISO, MBR, NTFS, SquashFS, UDF, VHD disk images and ZIPX.
You can download 7-zip from https://www.7-zip.org
Win32 Disk Imager.

Win32DiskImager is used to write raw image files to SD and USB memory devices or to back up an SD or USB device to a raw disk image file.
We are going to use it here to create a bootable USB stick to install Ubuntu Linux on our home server.
You can download Win32 Disk Imager from https://sourceforge.net/projects/win32diskimager/files/Archive.
You can download the installation file here to install Win32DiskImager, but you can also download a ZIP file with the binaries. You can extract this and then run Win32DiskImager without having to install it.
HDD Low Level Format Tool.
If for some reason you can't get your USB stick formatted normally after using it as a boot device, you can always use the HDD Low Level Format Tool to perform a quick wipe. After that, Windows will be able to format it again normally.
You can download HDD Low Level Format Tool from https://hddguru.com/software/HDD-LLF-Low-Level-Format-Tool.
Again, you can choose to download the installation file and install the HDD Low Level Format Tool, or to download the Windows executable that you can run directly without installing.
An account with a Dynamic DNS provider.
What is DNS?
Every computer on the internet, including e.g. a web server, has a so-called IP address. When you request a web page with your web browser, your computer connects to the IP address of the server. For people, all those numbers are difficult to remember, and that is why we enter a URL in the form of server.domain.com in the address bar of the browser, so e.g. www.jan-jansen.nl. Your computer must then somehow find out what the IP address is of the server on which www.jan-jansen.nl is running. In the past, at ARPANET and the early days of the internet, tables were manually kept in text files. Fortunately, that is no longer necessary for a long time. These tables are currently maintained on a worldwide network of DNS servers. (DNS stands for Domain Name System). Nowadays, if you want to connect to www.jan-jansen.nl, your computer simply asks a DNS server for the IP address of www.jan-jansen.nl. Again, it still is nessesary to manually configure the domain name and the corresponding IP address somewhere in this DNS system, but after that the information is available all over the world.
The problem is that with most ISPs your home connection does not have a fixed IP address. It is possible that your IP address changes, for example after a failure or after restarting your modem/router. When your IP address changes, you have to change this in the DNS system. The problem is, you don't know if or when your IP address changes. So this is an unworkable situation, but luckily there is such a thing as Dynamic DNS.
What is Dynamic DNS?
Dynamic DNS is a service that is offered, sometimes free and sometimes paid, by different providers. You do need an account for this with a Dynamic DNS provider, as well as a domain name. The providers of Dynamic DNS also offer a 3rd level domain name in the form of yourservername.dynamicdns.com or something like that. In this example, .com is the top level domain, .dynamicdns is the 2nd level domain name, and your server name you chose is the 3rd level domain name. Usually there is a very limited choice available for the 2nd level domain name, but that does not have to be a problem.
After you have registered your dynamic domain name, you have several options to update this when your IP address changes.
The first option is to let your router do this. In that case, a program runs in your router that, as soon as a change of your IP address is detected, passes it on to the servers of your Dynamic DNS provider. This program is then part of the software on your router, and that is where the problem lies. Not all routers support this, and if so, not every Dynamic DNS provider can be configured here.
If your router does not have a Dynamic DNS program, or does not support your Dynamic DNS provider, there is a second option. You then have to run a program on a computer in your home network that regularly, for example every 5 minutes, makes contact with the servers of your Dynamic DNS provider. When those servers see that this is happening from a different IP address, the registration is adjusted. Because my own router at home does not have a Dynamic DNS program on board, I also use this option. But even if your router does support Dynamic DNS, you can still implement it in this way. This is something that will always work.
There are several providers of Dynamic DNS services. The best known are DynDNS, No-IP, Securepoint DynDNS, ClickIP, NameCheap, YDNS, FreeDNS, Dynu, DuckDNS, ClouDNS, etc. Most of them have, as mentioned, both a free and a paid version, each of which has its own pros and cons. For a long time Securepoint DynDNS was one of the best free providers, but unfortunately this free service is now only available to customers who have purchased Securepoint hardware.
Although this may be a personal opinion, I think Dynu is one of the better providers of free Dynamic DNS at the moment. I also use this myself, and the description below also explains how you can use this.
Dynu Dynamic DNS.
Why I chose Dynu? Dynu's Dynamic DNS service has been around for a while, is stable and has good ratings. In addition, the free version already has a lot of useful options.
Create an account with Dynu.
We gaan eerste een account aanmaken en een gratis Dynamic DNS domeinnaam aanmaken bij Dynu.
- Go to www.dynu.com and click on the “Create account” link at the top of the page.
- Enter your first name, last name, a username, a password and your email address in the form.
- Activate the checkbox “I'm not a robot” and submit the form.
- You will receive an email to verify your email address. Click on the link in the email to confirm your email address.
- Login with this account at dynu.com.
- In the Control Panel, go to DDNS Services and click on the “Add” button.
- Enter a host name of your choice at “host”, choose one of the 9 free domain names at “Top Level” and click on the “Add” button.
- You will now enter a form in which your IP address has already been entered (see the picture below). Check if this is correct and click on the “Save” button.
- Your Dynamic DNS name is now active.
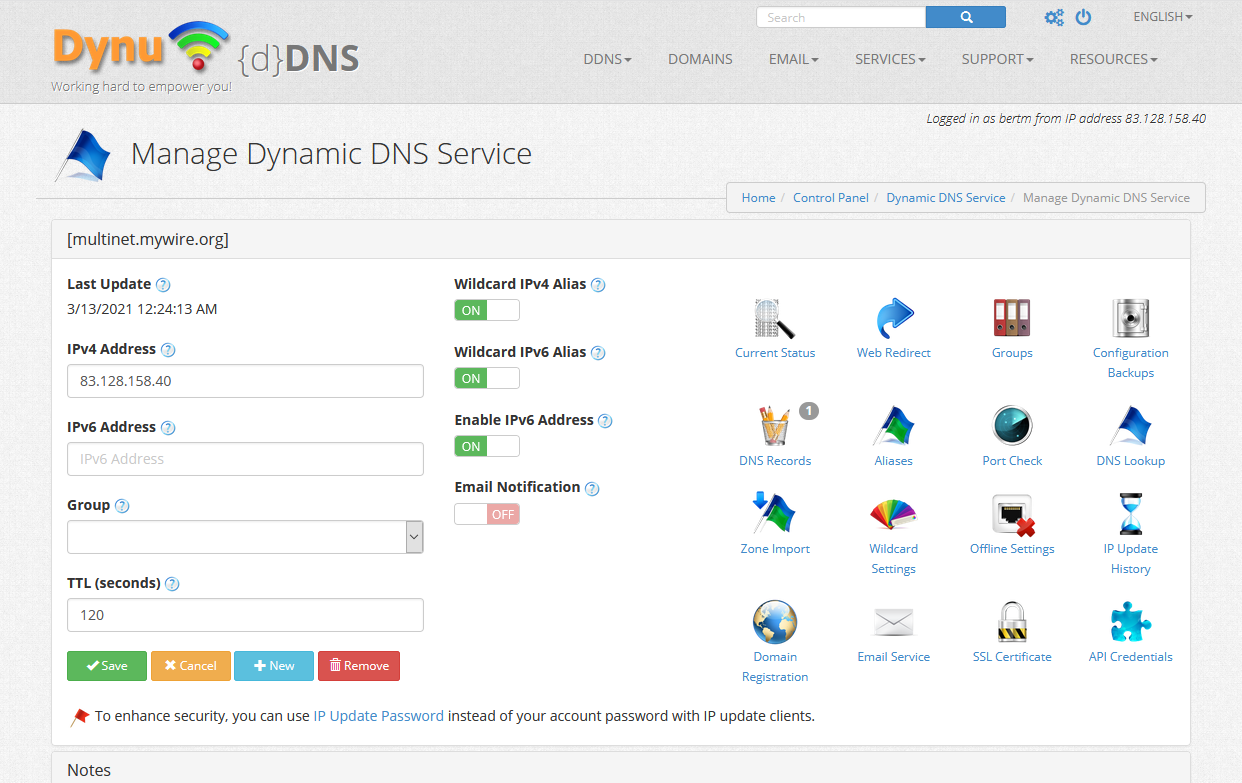
As you can see in the screenshot above, “Wildcard IPv4 Alias” is enabled. This means that not only your chosen host name is forwarded to the IP address you have at home, but also all sub-domains. We will be making good use of this when we set up the web server. We can then access it as webservername.hostname.topdomain.name, so e.g. webserver.multinet.mywire.org.
Your own super great domain name.
You now have your own free domain name active with Dynu, but you may not be satisfied with that domain name. The choice for a domain name was of course very limited, and you might want something like “supersite.com”. In that case you will have to register the domain name supersite.com with a DNS registrar, and that is of course not free. But if you have registered this domain name, you can have it redirected to your dynamic dns domain name. How to do this will be explained later in the description of creating the site, but you can already register your desired domain name so that it is still available when we start using it.p>
A dedicated internal IP address for the server laptop.
Consider in advance which IP address the server laptop should use in your home network. We are going to configure this address static (fixed) in the server laptop so that we do not run the risk of it getting a different IP address when it is restarted.
Configure Port Forwarding in your router.
What is Port Forwarding and why do I need it?
First, let's see what an IP port is.
Any program that runs on a computer and that has to communicate with the internet “binds” itself to an IP port. An IP port has a number between 1 and 65536 and is actually the “network address” that the relevant program has within the computer. All data that the program sends goes out via the address of the computer with the IP port as “sender”, and all data that the program needs to receive comes in at the IP address of the computer with the IP port mentioned. In this way the computer knows to which program to deliver the data. Some programs on your computer, such as e.g. a Telnet terminal, only use 1 IP port, but other programs use more. For example, a web browser uses a separate port for each tab you have open. If you then request a web page, that request will be sent from the IP port to which the relevant browser tab is connected. The response (the web page) will then arrive at the same port, and will therefore be delivered to the correct tab of your browser.
Most programs on your computer bind to a random IP port, but for the services that run on a server, agreements have been made about which IP port is used. Thus e.g. it has been agreed that a web server will bind to IP port 80 for the HTTP protocol and to IP port 443 for the HTTPS protocol. This way a web browser knows to which IP port to send the request for the web page.
Network Address and Port Translation.
The story would be over if all computers were directly connected to the internet, but with the computers in our home network there is something else going on. Because there are simply too few IPv4 addresses available in the world, they all have an address in an address range that cannot be routed through the Internet. In this way, the same range of IP addresses can be used within all different houses. Your router uses a trick to translate all those different internal home addresses to the one external IP address of your internet connection.
This trick is called “Network Address and Port Translation”, and works something like this: When a computer in your home network requests a web page, it sends that request from its own IP address and IP port to IP port 80 on the IP address of the server . When this request goes to the internet via your router, your router changes the “sender” into its own external IP address and any of its own IP ports. The router makes a note in the so-called state table where it records what the IP address and IP port of the original request were, and which IP address and IP port it entered as the sender. When the response to the request comes in at the external IP address and IP port of the router, it checks the state table to see where the original request came from. The router then sends the response there and removes the entry from the state table.
Port Forwarding.
Of course, this only works well when all requests for e.g. web pages come from the internal home network. But if you run a web server at home, it also has to work the other way around, and then there is a problem. When a request for a web page is made on IP port 80 on the external IP address of the router, your router does not have an entry for this in the state table, and therefore does not know where to deliver that request.
Fortunately, we can configure Port Forwarding in most routers. If we e.g. have a web server running at address 192.168.1.10, we configure the router so that if an unsolicited request comes in on port 80 at the external IP address, it forwards it to port 80 of the web server at address 192.168.1.10. When the web server then sends the response to the IP address from which the request came, the router sees that the data comes from an address and an IP port for which Port Forwarding has been configured. The router will not change the IP port, but will simply forward it from port 80 of its own external IP address.
Configure Port Forwarding in your own router.
To make your web server accessible from the internet, you must forward port 80 for the HTTP protocol, and port 443 for the HTTPS protocol. If you also want others to host their website on your server, you must also give them access to the future management interface of the server so that they can maintain their site themselves. In that case you also have to forward port 10000. If you also use the server for other things, such as e.g. FTP server or Mail server, some extra ports need to be forwarded. If that is the case, I will indicate this in the relevant descriptions.
You can find out how to configure Port Forwarding in your specific router in the manual of your router. But ...... Of course you have lost that manual a long time ago. Fortunately, this is very similar for the different router models from a particular supplier. For a number of routers that I am familiar with myself, it is described below how this works.
If you still can't figure it out, you can probably find out how to do this for your router at https://portforward.com/router.htm. This website has a description of how to do this for many different routers.
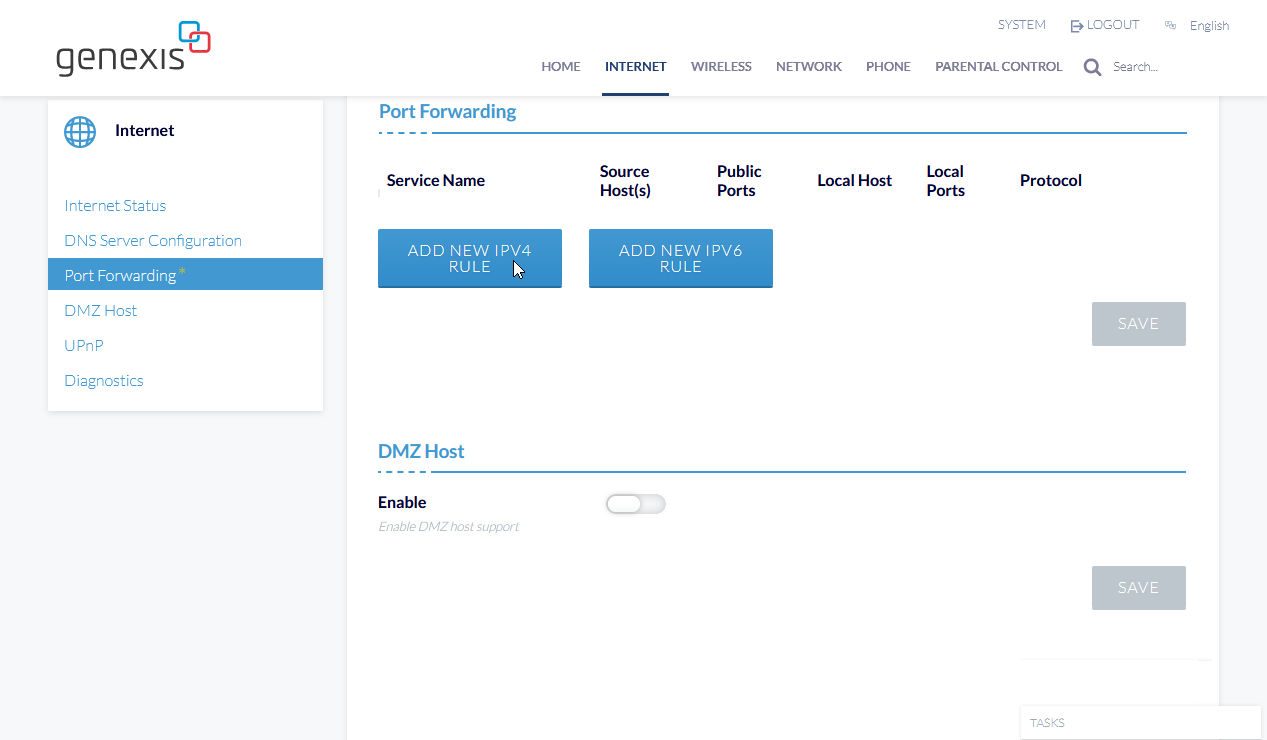
Genexis Platinum-7840
This is the router supplied to me by my own ISP with my fiber optic connection, and here is described how it works there.
- Open your browser and just login to your router with the admin account.
- Click “INTERNET” in the top menu.
- Click on “Port Forwarding” in the left menu.
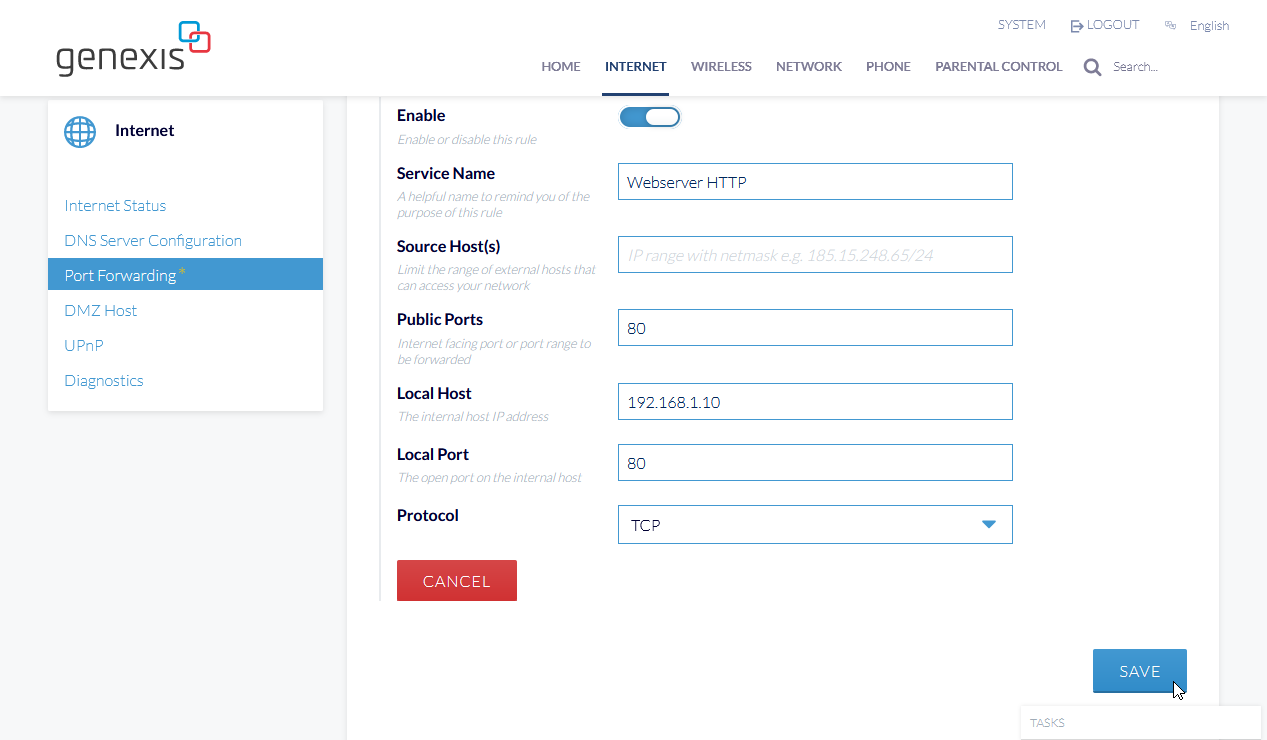
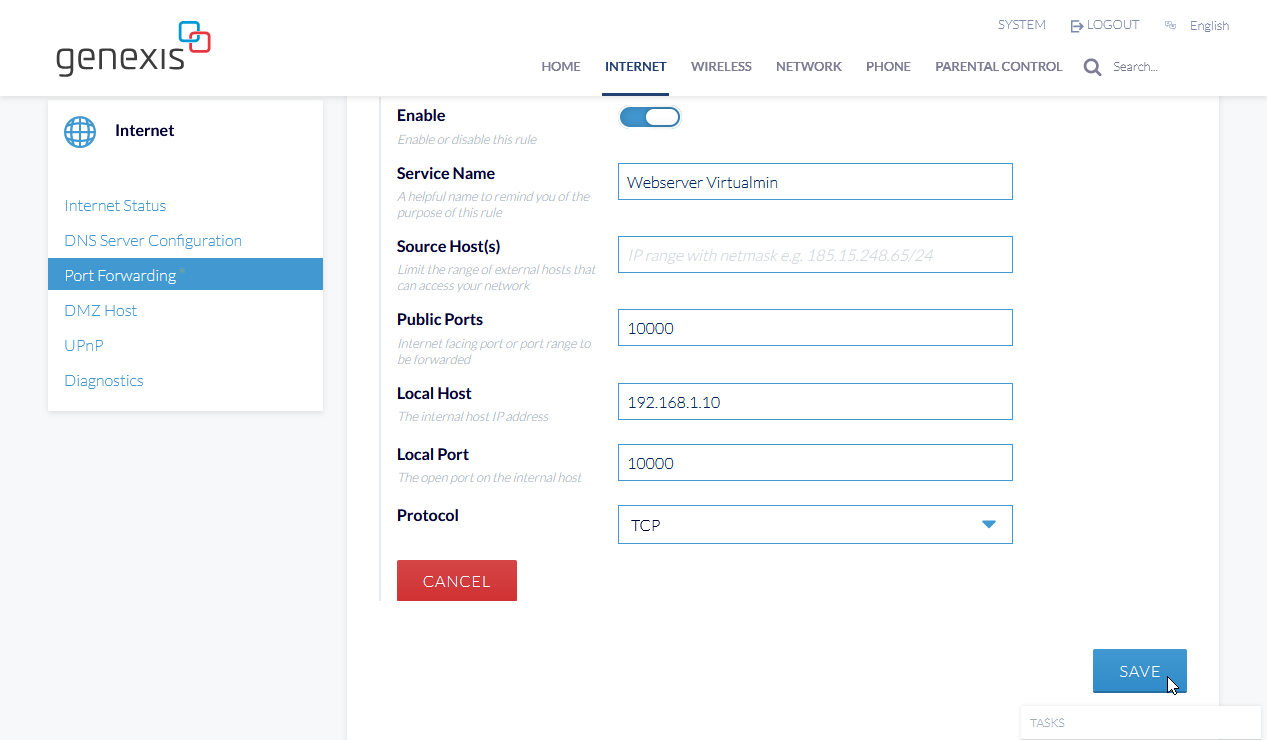
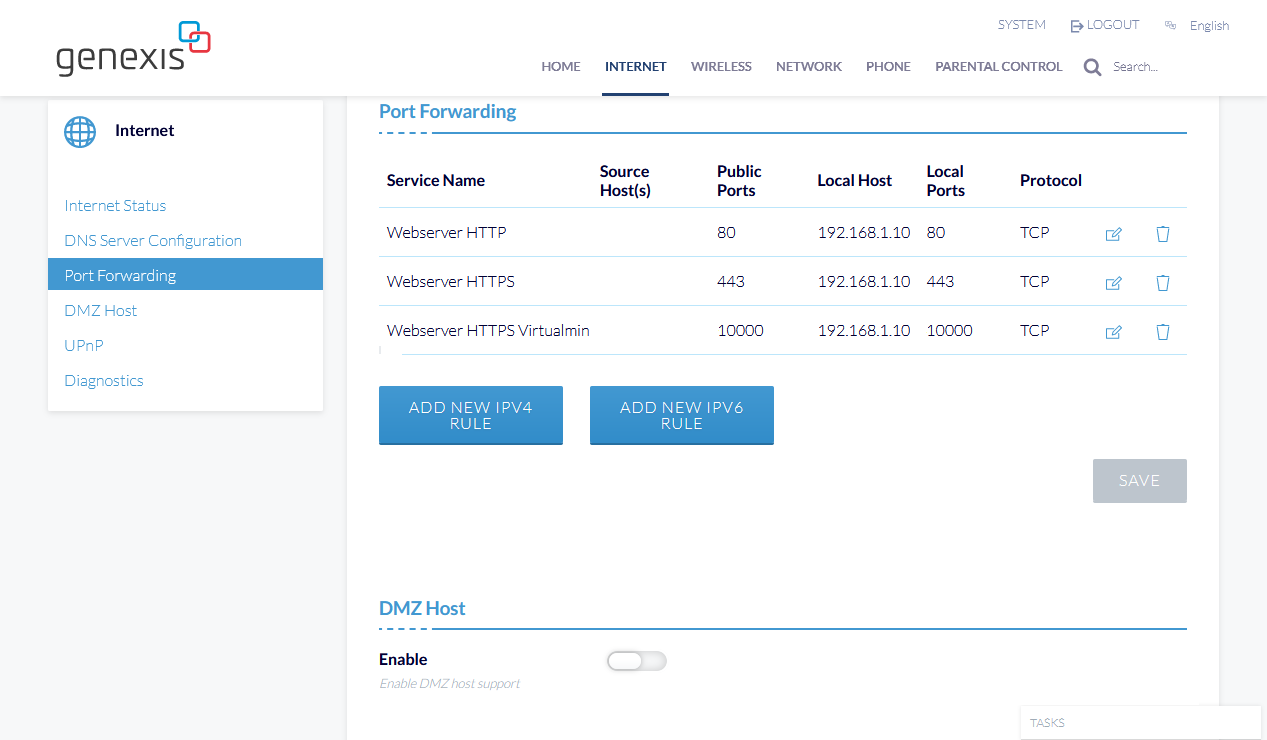
- Click on the “NEW IPV4 RULE” button, fill in the information below and click on the “SAVE” button:
- Service Name “Webserver HTTP”
- Public Ports “80”
- Local Host “192.168.1.10” (this must be the IP address of your server laptop)
- Local Port “80”
- At Protocol, select “TCP”
- Repeat step 4, but now enter the following information:
- Service Name “Webserver HTTPS”
- Public Ports “443”
- Local Host “192.168.1.10” (this must be the IP address of your server laptop)
- Local Port “443”
- At Protocol, select “TCP”
- If you also want to be able to manage your web server from the internet, repeat step 4 again, but now with the following information:
- Service Name “Webserver HTTPS Virtualmin”
- Public Ports “10000”
- Local Host “192.168.1.10” (this must be the IP address of your server laptop)
- Local Port “10000”
- At Protocol, select “TCP”

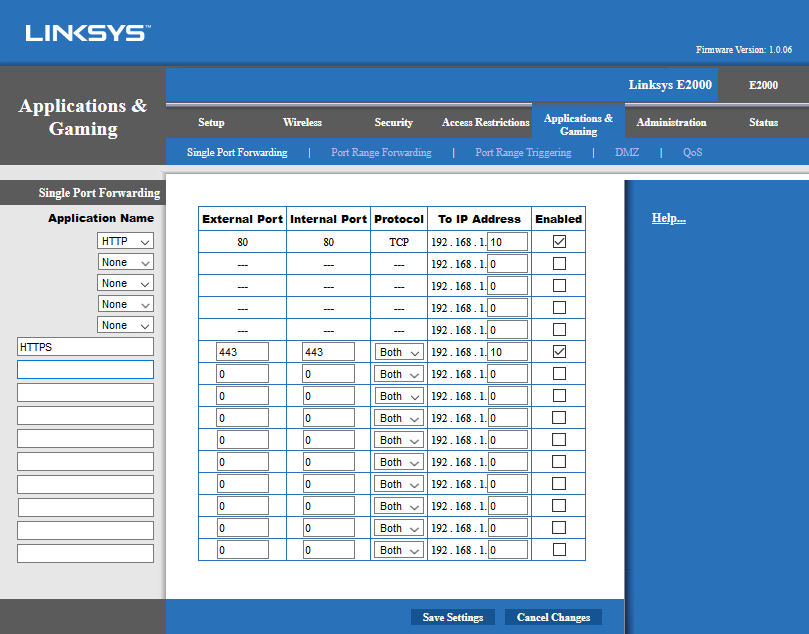
Linksys
- Open your browser and login to your Linksys router with the admin account.
- Click “Applications & amp; Gaming” and on the line below on “Single Port Forwarding”.
- There are already a number of well known ports pre-baked in the form.
- Select “HTTP” in the dropdown box on the left.
- Enter the IP address of your laptop server in the “To IP Address” column.
- Place a check in the box in the column “Enabled”.
- We now also need to forward the port for HTTPS, which is not pre-baked. Enter the following on the first line below the dropdown boxes:
- Enter “HTTPS” in the Application Name field.
- Enter “443” at External Port.
- Also enter “443” at Internal Port.
- Enter the IP address of your laptop server in the “To IP Address” column.
- Place a check in the box in the column “Enabled”.
- If you also want others to host their website on your server, you must also give them access to the future management interface of the server so that they can maintain their site themselves. In that case you also have to forward port 10000. Enter the following in the next line:
- Enter “HTTPS Mgmnt” in the Application Name field.
- Enter “10000” at External Port.
- Also enter “10000” at Internal Port.
- Enter the IP address of your laptop server in the “To IP Address” column.
- Place a check in the box in the column “Enabled”.
- Click on “Save Settings”.